How to Add "Click to Tweet" Links to Your Gatsby Blog
August 09, 2020
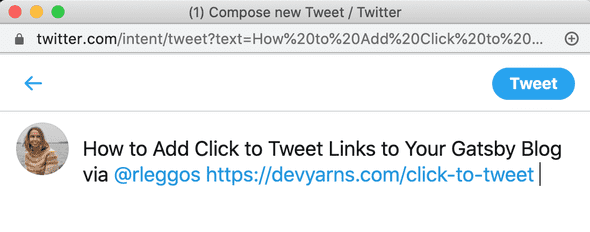
At the bottom of each of my posts, I have a link that says “click here to share this post on Twitter.” Clicking this link opens a new, small window showing a pre-filled “Compose new Tweet” Twitter interface. It does so without leaving the page. That tweet is pre-populated with the title and link to the post to be shared, as well as my username, as in the screenshot below.
You can accomplish this by adding three things to your Gatsby blog post template:
- A variable to hold the content of the tweet.
- A function that runs when someone clicks your link.
- A link with a click handler to run your function.
Let’s take a look.
Assumptions
I created my blog using the Gatsby Starter Blog. This tutorial assumes your blog also uses Gatsby and that your Gatsby blog has a blog post template that displays content from Markdown files.
If you created your site using one of the popular Gatsby starters for blog sites, you should already have a blog post template file.
The blog post template for the blog starter I used can be found in src/templates/blog-post.js.
If you don’t know what your blog post template is or how to use it, check out my quick, beginner-friendly guide.
Step 1: Pre-Populating the Tweet
Twitter provides the ability to create a link with various parameters that get translated into a tweet. For my “Click to Tweet” link, I used the text, via, and url parameters. There is also an available hashtags parameter.
For more details on exactly how these parameters work, visit the “Tweet text components” section of the Tweet button developer Twitter docs.
Getting the Post Title and URL
You should have a GraphQL query in your blog post template that looks something like the following:
export const pageQuery = graphql`
  query BlogPostBySlug($slug: String!) {
    site {
      siteMetadata {
        title
        siteUrl
      }
    }
    markdownRemark(fields: { slug: { eq: $slug } }) {
      id
      excerpt(pruneLength: 160)
      html
      frontmatter {
        title
        path
        date(formatString: "MMMM DD, YYYY")
      }
    }
  }
`
markdownRemark gets the info about your post and frontmatter gets the post’s metadata that you’ve defined at the top of your post. For more on this, see the ‘GraphQL Query’ section of my beginner’s guide to Gatsby blog post templates.
You can access the results of the query with the data object. For example, to get the title of your post, you would access it with data.markdownRemark.frontmatter.title.
To simplify things a bit, I created a post variable as shorthand. I added this at the top of my BlogPostTemplate component (before the return).
const post = data.markdownRemarkNow, I can access the title of my post with post.frontmatter.title and the relative path to my post with post.frontmatter.path.
To build the full URL to my post, I also need my site’s URL, which I can access with data.site.siteMetadata.siteUrl.
Building the Tweet
I combined all of this into a URL that Twitter can use to create my tweet and saved it to a variable called tweet. I added this to my BlogPostTemplate component, after the post variable and before the return.
const tweet = `https://twitter.com/share?text=${post.frontmatter.title} \
  via @YOUR_USERNAME&url=${data.site.siteMetadata.siteUrl}/${post.frontmatter.path}`
Make sure to replace YOUR_USERNAME with your Twitter handle!
Step 2: The Click Handler Function
Now, let’s create a function that opens a new window with our tweet. We will call this function when someone clicks our ‘Click to Tweet’ link and we will pass that click event into our function.
Here is the function:
const shareOnTwitter = event => {
  event.preventDefault()
  window.open(event.target.href, "twitter-share", "width=550,height=235")
}
Let’s break it down.
First, we need to call event.preventDefault() to keep the browser from immediately navigating away from the page to follow the link’s URL, which would be the default behavior.
Next, we tell the browser to open a new window that is 550 pixels wide and 235 pixels tall with the URL of the clicked link.
We access the URL of the clicked link with event.target.href.
The twitter-share parameter is necessary for Twitter to know what to do with your URL.
You can update the pixel values after width and height to alter the size of the window that opens.
I added this function directly to my BlogPostTemplate component, after the post and tweet variables, but before the return.
Step 3: Displaying the Link and Hooking It Up to the Function
Finally, inside our component’s return statement, we can display our link! I used an anchor tag as follows:
<a href={tweet} onClick={event => shareOnTwitter(event)}>
  Click to Tweet
</a>
Recall that the tweet variable is the URL we built that tells Twitter how to compose the tweet.
We add an onClick event listener to the anchor tag that performs a function when someone clicks the link. Here, when the link ‘hears’ a click event, it catches that event and passes it into the shareOnTwitter function we created in the previous section.
That’s it!
All Together
Here is a simplified version of my BlogPostTemplate component with the lines I covered in this tutorial highlighted.
// imports here

const BlogPostTemplate = ({ data, pageContext, location }) => {
  const post = data.markdownRemark  // other variables as needed

  const tweet = `https://twitter.com/share?text=${post.frontmatter.title} \  via @rleggos&url=${data.site.siteMetadata.siteUrl}/${post.frontmatter.path}`
  const shareOnTwitter = event => {    event.preventDefault()    window.open(event.target.href, "twitter-share", "width=550,height=235")  }
  return (
    <Layout location={location} title={siteTitle}>
      <article>
        <header>
          <!--- stuff at the top of my post --->
        </header>
        <!--- content of my post --->
        <section dangerouslySetInnerHTML={{ __html: post.html }} />
        <section className="article-footer">
          <a href={tweet} onClick={event => shareOnTwitter(event)}>            Click to Tweet          </a>        </section>
        <footer>
          <!--- stuff below my post --->
        </footer>
      </article>
    </Layout>
  )
}

//export here

//graphql query here
